Return to Homepage
How to setup the SOUND DETECTION TOOL
Your device will not arrive pre-built. This is to preserve the integrity of actually doing something for yourself and being rewarded with a totally revamped home security.
Here is how you will set up your device.
You will need:
- a personal computer or laptop running Windows 11 or later
- the Arduino Uno R3 board
- the Arduino IDE software program for Windows
If you do not have the ability to code in a way where the device will function half-decently, please purchase the add-on where an experienced technician will call to your house to set it up for you. If you are able to code, please continue following this guide.
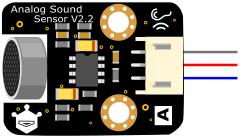
Above is a diagram of the module you will receive. Follow the below guide to connect the SOUND DETECTION TOOL to the Arduino Uno R3 board carefully.
- Step 1: Insert the thick end of the wire set, connecting all three differenty coloured wires together, into the port on the SOUND DETECTION TOOL.
- Step 2: On your Arduino Uno R3, plug the black/grey cable into the port labelled GND 0.
- Step 3: On your Arduino Uno R3, plug the blue cable into the port labelled A 0.
- Step 4: On your Arduino Uno R3, plug the red cable into the port labelled VCC 0.
- You have now connected SOUND DETECTION TOOL to the Arduino Uno R3 board.
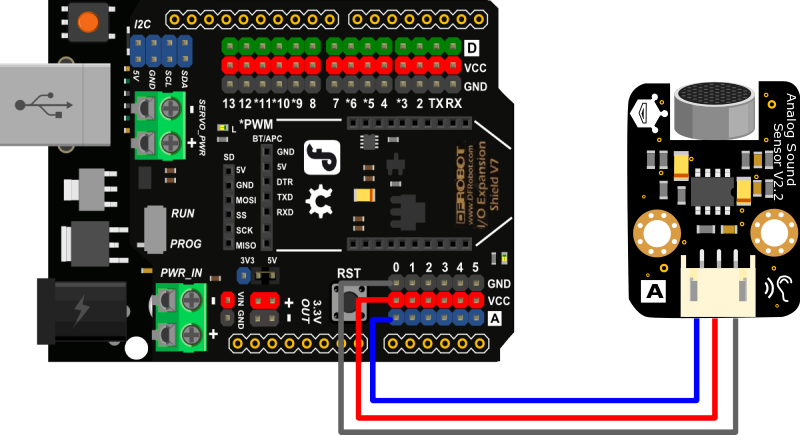
Confirm that your board looks like the above image before proceeding.
Now, if you have obtained an LED addon, let's set that up next.
- Step 1: Insert the thick end of the wire set, connecting all three differenty coloured wires together, into the port on the LED module.
- Step 2: On your Arduino Uno R3, plug the green cable into the port labelled DIGITAL 3.
- Step 3: On your Arduino Uno R3, plug the black/grey cable into the port labelled POWER GND.
- Step 4: On your Arduino Uno R3, plug the red cable into the port labelled POWER 5V.
- You have now connected the LED module to the Arduino Uno R3 board.
Your board is now prepared.
Now, it's time to enter code into the Arduino IDE software program.
- Step 1: Install the Arduino IDE software program onto your computer.
- Step 2: Plug the Arduino Uno R3 set up with the LED module and SOUND DETECTION TOOL into the USB port on your computer.
- Step 3: Use the USB dropdown menu to select your device, and search for Arduino Uno and select that as well.
- Step 4: Now, enter the code required to operate SOUND DETECTION TOOL You will find it in the image below.
- Step 5: Now, upload your code using the arrow button on the top left of your screen.
- SOUND DETECTION TOOL is now ready for use.
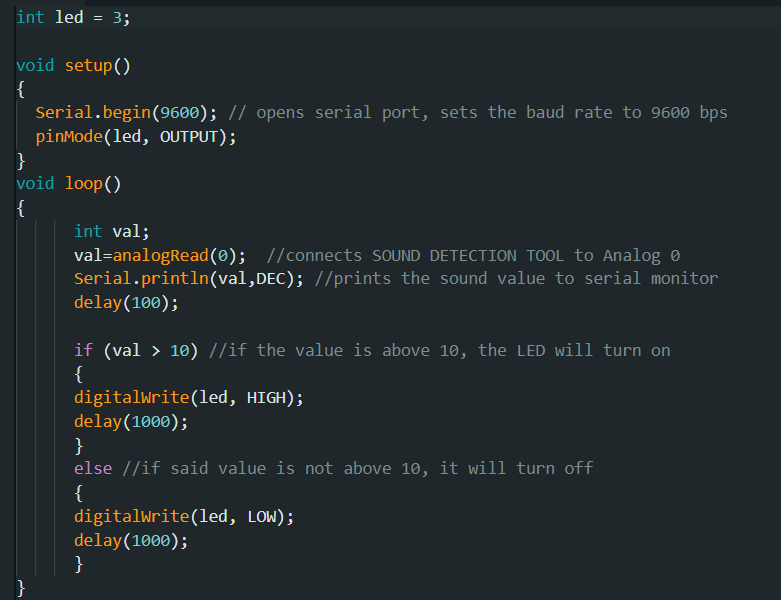
The code you see above is the code required to operate the device properly.
Please allow the speaker presenting to explain this code now.
What does SOUND DETECTION TOOL do when it has power?
You will notice the green light on the Arduino Uno R3 device, meaning that it is powered on and ready for use.
Speak loudly and clearly into the SOUND DETECTION TOOL's sound sensor. If the device's code has processed correctly, the LED will flash on high level for 1000 milliseconds.
When the device does not hear sound or pick up a loud enough frequency, the LED will turn off.
SOUND DETECTION TOOL is a device capable of great things. However, it cannot pick up subtle noises, only noises that are close and loud, like a loud voice or a jet plane taking off.
Allow the speaker to demonstrate the product now.